Black Lacquer Paint for Piano
Matt is a professional painter and freelance writer, sharing his knowledge, house-painting tips, and product reviews.
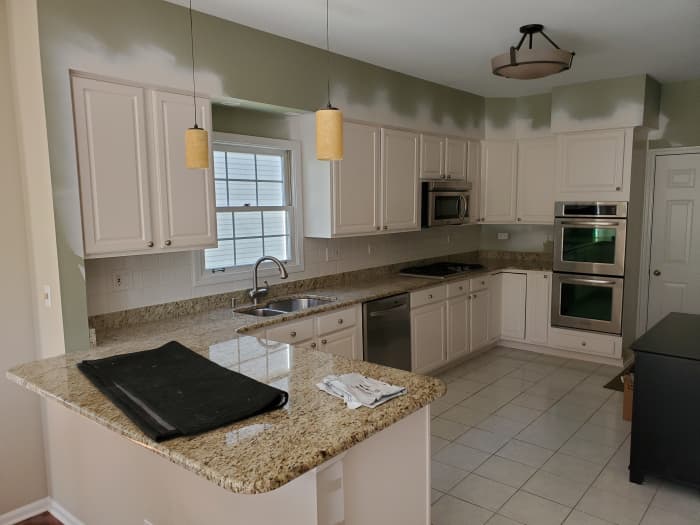
Kitchen cabinets I sprayed with white lacquer. The color is Snowbound from Sherwin Williams.
Paint vs. Lacquer for Kitchen Cabinets
I've spray painted hundreds of cabinet doors with white enamel from Sherwin Williams, including Pro Classic and Emerald urethane, but I've recently started using white pre-catalyzed lacquer with excellent results. Enamel is readily available from practically any paint and home improvement store, but if you're spraying your cabinets, consider using white lacquer instead. I'll explain why.
Paint and Lacquer Durability
Acrylic enamel, or acrylic alkyd, looks and performs great on cabinets, but when it comes to the long-term durability factor, pre-catalyzed lacquer is superior. If your cabinets need to be cleaned frequently, lacquer is easier to maintain.
Chemical resistance: Food spills and fingerprints wipe off lacquered cabinets easily without compromising the finish. The chemical resistance is a lot better than paint. Paint de-glosses from cleaning too aggressively, or from chemical cleaners. You can apply a clear coat over painted cabinets to make them more washable, but with lacquer, a separate clear coat isn't needed.
Coating hardness: I have used both acrylic and acrylic alkyd enamel, which dries harder than regular acrylic, but there isn't a huge difference in hardness between the two. With catalyzed lacquer, the added catalyst makes the coating dry harder. The finish is noticeably harder and smoother than the acrylic enamel I've used in the past. Paint dries softer and mars easier. You have to be careful when handling freshly painted doors, especially darker colors that dry slower.
Spraying Paint and Lacquer
The pre-catalyzed lacquer I use can only be sprayed because it dries too fast for brushing. You can spray it with either an airless sprayer or an HVLP sprayer. I use a small airless sprayer with a sealed motor. Lacquer is thin in consistency and lays out super smooth when sprayed. With the right spray set up, enamel lays out nice too, but after using both, the sprayed finish of lacquer definitely looks and feels smoother.
Dry time: Pre-cat lacquer dries lightning fast. I can spray a cabinet door and pick it up thirty minutes later without marking the finish. Enamel usually must dry overnight, or longer, before you can handle the painted doors. From a production standpoint, the fast dry time is a game-changer for my cabinet painting projects. You will complete your cabinet project faster than if you were using paint.
The fumes: The biggest disadvantage of lacquer is the terrible smell. It's strong and it lingers. Ventilation and a good respirator are an absolute must. The smell does gradually dissipate a few days after drying. The odor of paint is far less pungent, although acrylic alkyd enamel smells pretty bad too. Opening windows and setting up box fans to exhaust the fumes makes a huge difference.
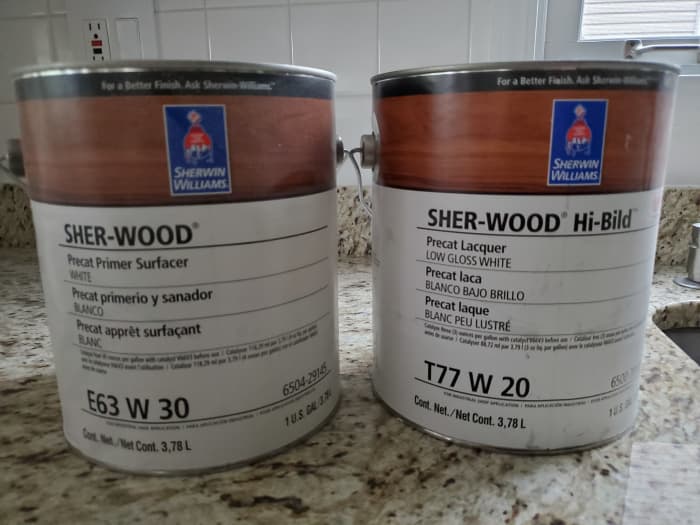
The pre-cat lacquer I use for kitchen cabinets.
Choosing Lacquer Paint for Your Cabinets
White lacquer looks very similar to white paint, but it's smoother and more professional looking in my opinion. I recommend using a pre-catalyzed lacquer for your kitchen cabinets for increased hardness and durability. A catalyst, similar to epoxy hardener, is added to the lacquer so it dries harder when fully cured. The store adds the catalyst for you in advance, or you can add it yourself, which is what I do on the day of spraying. The pot life is three months after mixing.
I use the Hi-Bild pre-catalyzed lacquer and primer surfacer from the Sherwood product line at Sherwin Williams. My local Sherwin Williams store doesn't stock either of these products. I have them shipped to my local store for color mixing. The Hi-Bild lacquer is only available in an extra-white base, so you can't use a dark color with this product, only white.
Call your local paint store and see what they have in stock. These products aren't readily available like your everyday paint, so you might have to place a special order locally, or from an online supplier. Make sure you order enough material for your project. I always order extra to make sure I have enough to finish.
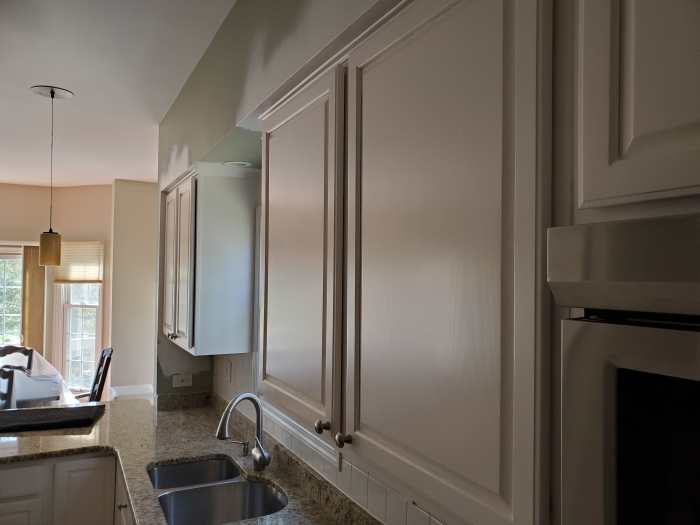
Cabinet doors I sprayed with lacquer in a low gloss finish. The finish is similar to semi-gloss.
Read More From Dengarden
Prepping Cabinets for White Lacquer
The surface preparation for using white lacquer on cabinets is the same as the surface prep for painting cabinets. Cabinets have to be cleaned and lightly sanded, followed by a lacquer-based primer surfacer and your topcoats. Remove all of the hinges and label everything carefully to avoid confusion when installing the doors at the end.
Surface cleaning: Since lacquer is solvent-based, it covers over surface stains better than water-based primer and paint, but you don't want to be spraying it over grease and contaminants. De-greasing agents from the paint store (Simple Green and Dirtex) and TSP are good surface cleaners. Wipe down the cabinets with a damp and clean rag to remove residue from the cleaner.
Lightly sand: The only sanding needed is light scuff sanding to dull the surface gloss. Don't sand down to the bare wood, especially oak cabinets. This exposes more of the wood grain and damages the wood. Use a finishing sander with 220-grit sandpaper. Sandpaper coarser than isn't necessary in most cases. Use fine-grit sanding pads, or sponges, for tight corners and grooves.
Caulk and repair: The grooves of the recessed panels on cabinet doors look nicer when caulked and painted, but I don't recommend caulking them. This floating panel is designed to allow expansion and contraction of the wood. Caulking these gaps can cause the caulk to crack when the wood expands. Caulk the sides of the cabinet boxes and any molding. Use Bondo putty to repair wood damage.
Mask the kitchen: Spraying cabinets doors and frames white involves a lot of masking. Cover everything not being sprayed with masking paper and plastic. A leak-proof floor protector, not red rosin paper, is best for the kitchen floor. These provide peace of mind in case of any chemical spills. Unless you're spraying the inside of the cabinets, cover the openings with tape and plastic.
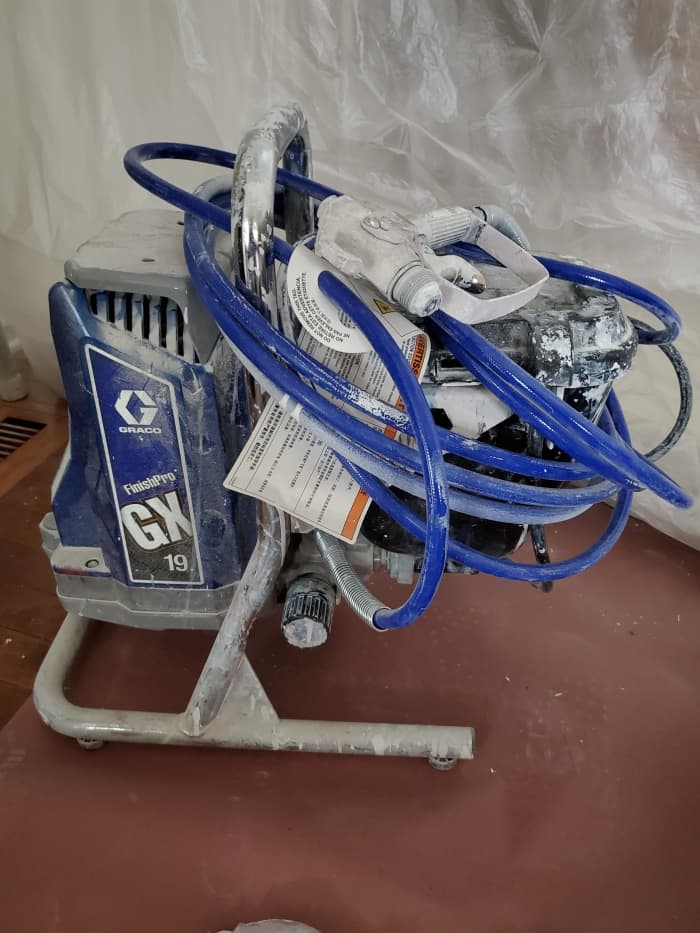
My Graco GX-19 Finish Pro.
Spraying White Lacquer On Cabinets
Using a paint sprayer is really the only way to apply this material because it dries too fast to be brushed on. I tried using my HVLP sprayer to apply the Sherwood pre-cat lacquer on a test board, but my sprayer didn't apply enough material fast enough to produce the right finish. I switched to my airless sprayer.
Choosing a sprayer: To get a smooth and uniform finish, you have to spray on a wet coat quickly. You can use an HVLP sprayer, but I use my Graco GX-19 airless sprayer with a fine finish spray tip to spray cabinets with white lacquer. This sprayer is from the Finish Pro series and is meant more for lacquer and thin coatings, although this sprayer works well for paint too. I highly recommend it. I set the pressure at about 1,900 PSI.
Make sure the sprayer you choose is equipped with a sealed motor for safe use with flammable coatings. The GX-19 is a professional Graco sprayer that includes a sealed motor and a long-lasting pump. Those cheap sprayers from the home improvement store usually cannot be used safely with flammable coatings. They don't have a sealed motor. These sprayers typically don't last as long as a professional sprayer too, especially with frequent use.
Fine finish spray tips: I use a Graco RAC-X tip guard and spray tip, specifically a 310, and this works really well for laying down a nice even coat on cabinet doors. The 6-inch spray fan from the 310 covers the surface of the door faster. A 210 tip, or even a 110, works well for spraying the narrow parts of cabinet frames. The green Graco FFLP tips (fine finish, low pressure) are best for spraying lacquer, or enamel. These tips last longer than the standard Graco spray tips.
Prime the cabinets: Unpainted cabinets should always be primed, regardless of using paint, or something else. I apply two coats of the Sherwood primer surfacer, followed by two coats of Sherwood Hi-bild lacquer. Both products are meant to be used together. Make sure the two products you choose are compatible. If you're adding a catalyst hardener, read the specifications and add the exact amount. Practice spraying on a test board first. Apply one to two coats of primer. Two coats give you better coverage with your topcoats.
Spray the lacquer: Spray the cabinet doors in one direction, overlapping each pass by about fifty percent. Spray the primer the same way. You can set up a temporary spray booth near a window, using plastic and a box fan for ventilation. Good ventilation is critical. Depending on the product you choose, lacquer dries to the touch in under one hour. You can spray two coats on the backside of the doors on day one and two coats on the front side on day two. You can't do that with paint. When spraying the frames, don't spray too heavy otherwise you will have a lot of drips to fix.
Graco GX-19 Finish Pro Features and Benefits
This content is accurate and true to the best of the author's knowledge and is not meant to substitute for formal and individualized advice from a qualified professional.
© 2020 Matt G.
Source: https://dengarden.com/home-improvement/Tips-for-Painting-Cabinets-with-Lacquer